Setting up the Facebook Tabs
Setting up the Facebook Tabs
Creating a new Facebook App
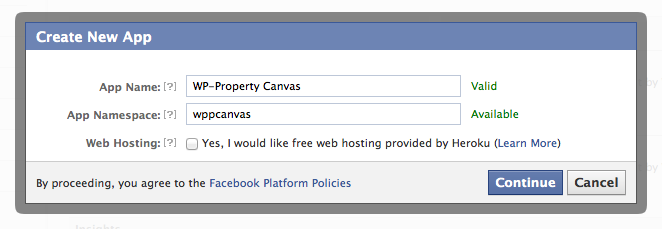
If you have never created Facebook applications, go to developers.facebook.com and click the “Create New App” Button on the top right side of your screen. This will give you a new dialog window in which you can enter the name and namespace of your new app. Enter any name you wish (for instance “[your company] Properties”. The namespace will be a part of the URL of your app on Facebook, so enter it accordingly. You can (and should) use a machine-friendly version of your App’s name like so: yourcompany-properties. Mind that these two pieces of information must be unique. Remember not to click the Web Hosting field, as it will not work with WP-Property.
Click Continue. Facebook will then give you an almost impossible captcha to solve. Good luck with that. Once entered, click Continue again. After this is finished you will be able to edit all the settings for your new App.
After you finish this process, you will be taken to your new application’s page. Right now you just need to copy your Facebook App ID and App Secret (key). You will find this information on the top of this new page. Remember that the App Secret is called secret for a reason. Never share it, treat it as a password.
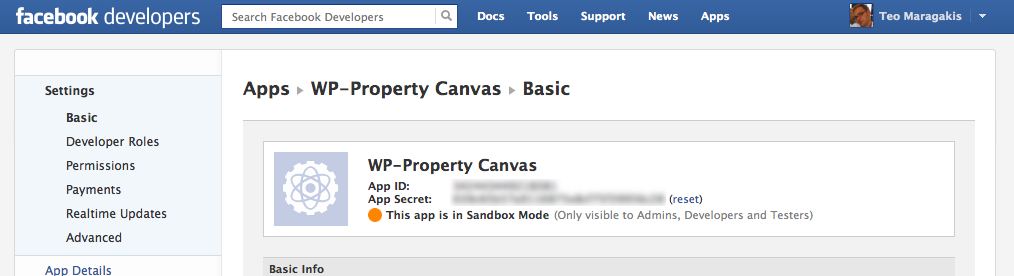
Your App ID and APP Secret keys will appear on top of the App settings page.
Creating a new canvas
Now that we have created our new Facebook App, and we have our keys, we need to set the Premium Feature up. Facebook Tabs uses Facebook App canvases, and that’s what we will be creating now. On your WordPress Dashboard, go to Properties → Facebook Tabs. There you will see a user interface which will allow you to create as many canvases as you wish. Each canvas will be a new Facebook Tab on your Facebook page.
Website-related settings

Name: Here you can name your new canvas. Note that the name you enter will affect the canvas URL.
Type and Page: The feature will either display a page or a single property on the canvas (tab). Since you can create as many as you want, you are not limited to the content you want to show on Facebook. Choosing “Page” from the drop-down input, will let you choose between the pages of your website. Choosing “Property”, will allow you to find a property by name. For the purposes of this example, we will choose “Page” and select the page that is used by WP-Property to render all properties. Remember that you can (and should) create another, more minimalistic page for use in the Facebook canvas.
Hide the selected page from Regular WordPress will appear only if “Page” type is selected and will do exactly what it says. Visitors to your website will not be able to see this page in your website (it will give them a 404 error).

Template: The options you will get here depend on your theme. We suggest using one without a sidebar, so you can have a better view in the relatively narrow canvas that Facebook allows you to use.
Enable theme’s template parts: Developers will know what to do with this. For regular users, we suggest using it with the option unchecked.
Open links in new window: This will open a new window / tab when users click on links on your tab on Facebook. If unchecked, the same tab will be used to lead to clicked links.
Open forms in new window: The same as above, but for forms.
Disable default CSS: This will disable any CSS included in your theme. Useful for users who want to customize their own style for their Facebook tabs.
Allow inline CSS: If checked, CSS added to the page as content, will be used for rendering. Combined with the “Disable default CSS” option, it will allow you to enter any custom CSS directly in the page and style the tab from scratch.
Facebook-related settings
App ID: Enter the App ID that facebook assigned to your application in the previous step.
App Secret: Enter the App Secret key that facebook assigned to your application in the previous step.
Save this page and go back to your application settings page on Facebook. The rest of the fields will be used there.
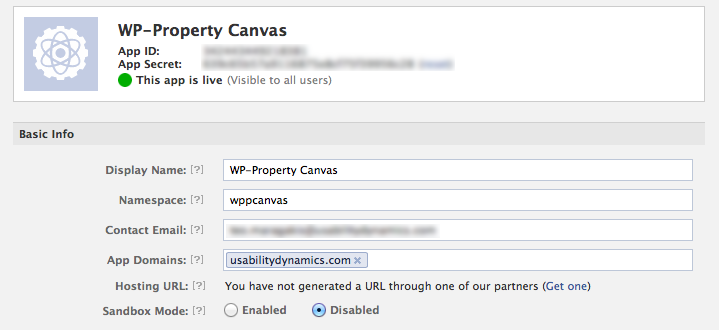
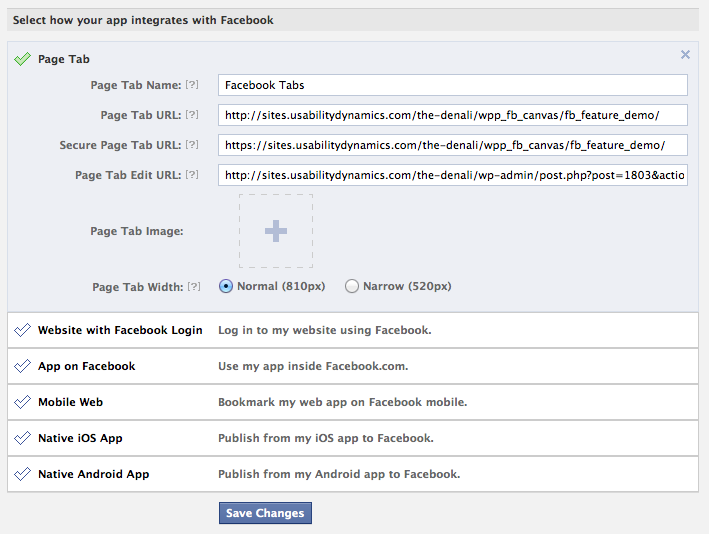
Continuing where we left off, proceed by adding your email in the Contact Email field, or leave the default one. In the App Domains field, add your site’s domain name, without the http(s) and www parts. You should just add the domain and extension like on the screenshot above. Finally, you can safely disable the Sandbox Mode. We are creating a tab application and testing is not necessary. In the next section, (Select how your app integrates with Facebook) click on the Page Tab entry.
Here you will be able to set the following:
- Page Tab Name: What will appear as the title of the tab in your Facebook page. This is not unique so you can enter anything you like. “Our Properties”, “Apartments”, “Find a Property” are all good ideas if your tab will contain property listings.
- Page Tab URL: Here you should enter the Canvas URL that you will find in the feature’s settings (where we left off above).
- Secure Page Tab URL: Same as above. Copy and paste the text in the Secure Canvas URL from the settings.
- Page Tab Edit URL: This will give you a link to edit the tab fast, from Facebook. Only you (and whoever you have made a developer for your app) will be able to see that link, so do not worry about your clients viewing random links. Go to your WordPress Dashboard → Pages, find the page you have set and click on the title. Copy the URL from the page that will open and paste it here.
- Page Tab Image: Click the + button on the right to upload a 111×74 pixel thumbnail that will appear on your page and represent this particular tab. Make it catchy!
- Page Tab Width: Unless you have specific reasons to want a 520px tab, leave this to Normal.
You are almost finished! Click Save Changes and go back to your Dashboard. Click on the “Add to Facebook” button which is next to the fields where you pasted your App ID and App Secret keys. This will give you a new dialog window on Facebook, in which you will be able to choose which Page you want to add your tab to. Once finished, visit your Facebook page and see the results!
You can create any number of pages you want in your WordPress installation and repeat the process to add more tabs. You can create tabs to display different property types, company information, squeeze pages and everything else you might need. This will work in combination with any plugin, not only WP-Property. Your options are limitless. We hope you enjoy this new great feature!